Category: Best Practices

Using the Moodle data privacy feature for data export

Moodle implemented a data privacy feature in response to Europe’s General Data Protection Regulation. CLAMP blogged about the GDPR and Moodle in 2018. The impact of the GDPR on the LMS at CLAMP schools has been limited. We do occasionally have students request exports of their data, and at the Connecticut Hack/Doc Fest we evaluated whether this feature would be helpful.

Data Privacy Officer

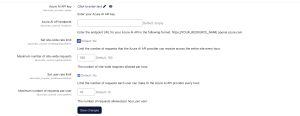
There is a “Privacy Officer” role in Moodle. “A Privacy officer can respond to data requests and manage the data registry.” A Moodle admin can do this too.

If enabled, Moodle users can send the Privacy Officer a request to download or delete all their Moodle data. The Privacy Officer receives an email notification and can approve or deny the request. If approved, a Moodle process starts to either generate a zip file containing all the user’s Moodle data or delete all the user’s data.

There are a variety of options to control the process, such as:

  • Allowing users to request data download or deletion
  • Automatic approvals of download or deletion of user data (self-service)
  • Only allowing the Privacy Officer (or admins) to download the user data

Enabling “Contact the privacy officer” shows these options in a user’s profile page.

Moodle administrative screen for a user to choose different privacy options

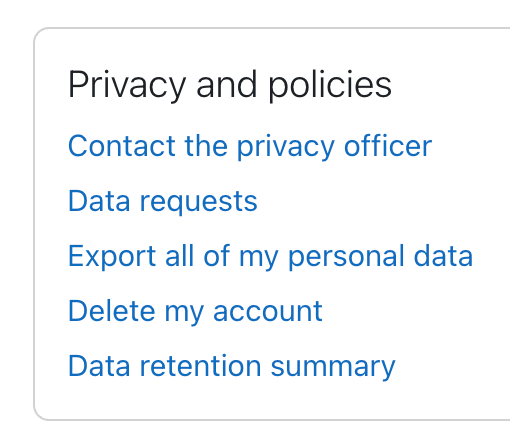
The data privacy settings are at: Site administration > Users > Privacy and policies > Privacy settings.

The exported user data file is a zip file containing an index.html file for handy navigation of the data.

  • User data includes things such as recently accessed items, messages and notifications, draft files, the last access to each course, and log and session data.
  • Course data includes activity data such as assignment submissions and forum posts, role assignments grades.
  • There are other information categories such as Antivirus failures, user preferences, and autosave data that seem less useful.
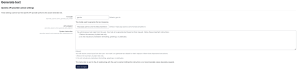
Data registry

Moodle has a data registry system to control the retention length of different types of data. For example, student submissions to an assessment may need to be retained indefinitely to be able to provide evidence of student accomplishments, whereas general coursework such as forum posts might only be retained until graduation + 12 months.

The data registry enables categories (types of data) and purposes (the reasons for processing data) to be set for all content on the site, from users and courses down to activities and blocks. For each purpose, a retention period may be set. When a retention period has expired, the data is flagged and listed for deletion, awaiting admin confirmation.

Categories and purposes can be very granular and set at the individual activity level. This seems like a huge amount of work if you want to retain quiz data for a different amount of time than forum posts. The primary driver for this feature seems to be the GDPR and it requires considerable setup. Much of the terminology is GDPR-specific.

Configuration screen for data registry and data retention

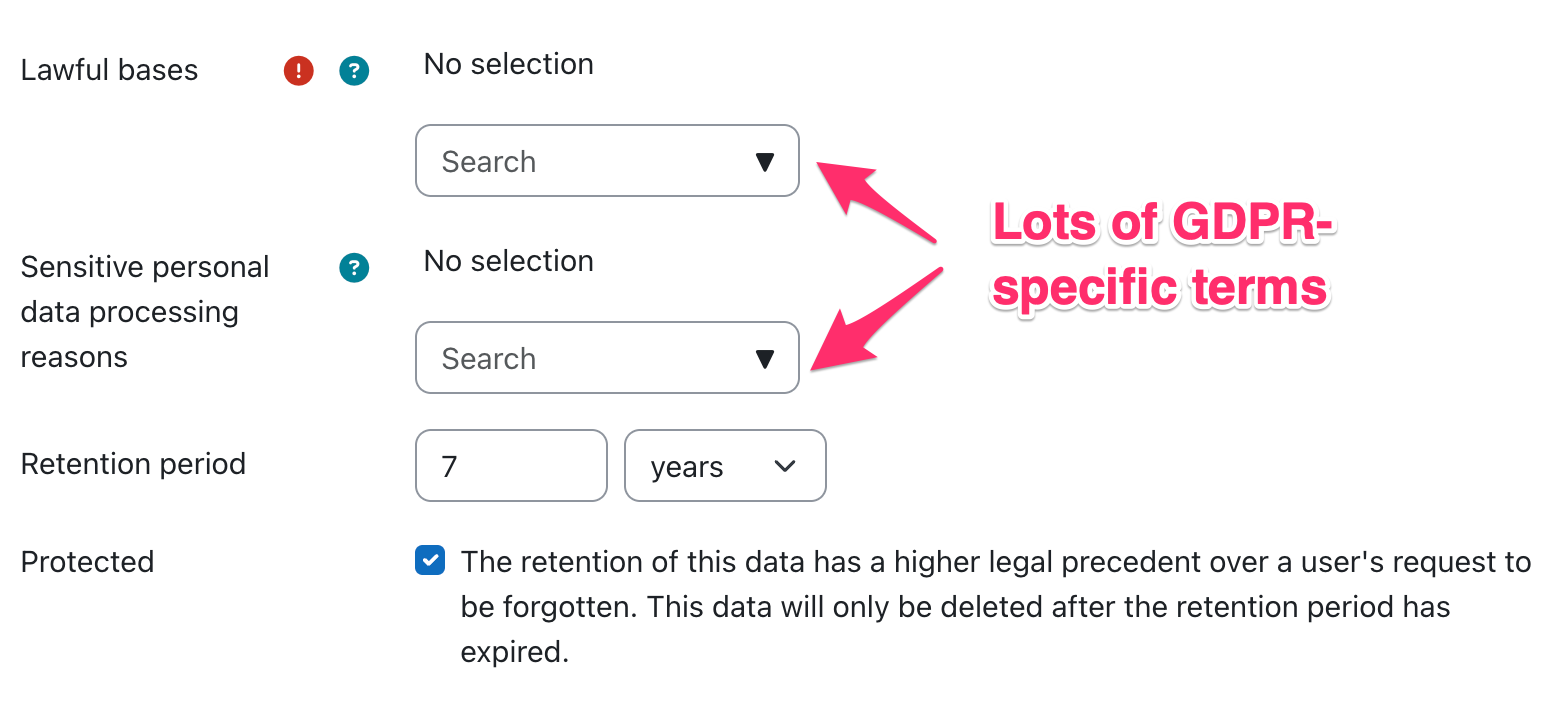
In some cases, the data retention policy can override the user’s deletion request.

Summary

Turning on user data requests seems like it could be helpful for graduating students who might want to keep a copy of their Moodle content. However, enabling the permission shows both the export and deletion options. It’s not possible to just enable export without enabling deletion.

Turning on user deletion requests seems potentially problematic since some of the data is used by faculty (e.g. course evaluations for tenure decisions). The Data Registry looks quite complicated and only seems useful for schools that want to implement strict data retention policies

Safe Exam Browser integration within Moodle

With some campuses seeing more interest by some instructors to employ lockdown browsers, a deeper dive back into Safe Exam Browser was done by a collective of Moodle HackDoc Winter 2026 participants: Jason Alley (Lafayette College), Gerard Gadigian (Connecticut College), Jim Nicnick (Lafayette College), and Andrew Ruether (Swarthmore College). CLAMP previously looked at this tool during the Winter 2021 Hack/Doc.

Overview

Safe Exam Browser (SEB) is a browser application that locks computers into a secure, full-screen mode for online quizzes and exams. Its purpose is to prevent access to unauthorized websites, applications, and system functions on a student’s device while engaging with the exam to eliminate the likelihood of cheating. While the browser is running in full-screen mode, keyboard shortcuts, screen capturing, internet browsing, and all applications not allowed by the exam configuration are disabled. The browser cannot be exited until the exam has been submitted if the instructor applies the setting in the configuration.

SEB is a free, open-source application intended for use on devices running on Windows, Mac, and iOS operating systems.

What worked well

SEB works only with the Moodle Quiz activity. Therefore, the user interface (UI) for SEB is available only within the Moodle Quiz activity. The standard functions behave as expected. Some functions to note:

  • Enabling access to the camera and microphone: this function provides students the ability to use their device’s camera and/or microphone to complete a Moodle Quiz question (i.e., using WebRTC). This is not used to proctor or surveil students.
  • URL filtering: To allow students access to specific websites, it’s possible to enable URL filtering. To achieve this, the instructor needs to enable URL filtering, which is off by default, and then enter the allowed URL(s) in the “Expressions allowed” field. Each allowed URL should be listed on its own line and omit the protocol (https://). Because the SEB does not provide Forward and Back navigation like a typical browser, it’s important to create allowed links in the Moodle Quiz question to open in a new window/tab. We discovered it’s also important when URL filtering is enabled, to also include one’s Moodle domain (e.g., moodle.lafayette.edu/*) with the asterisk wildcard serving as a catch-all for all sites on the Moodle domain.

What worked, but not so well

  • Unexpected computer behavior: When SEB launches, it closes many applications on one’s computer and can leave browser windows/tabs in odd states requiring a refresh. The macOS version does not warn the user ahead of time–the Windows version does–that many applications will be closed. It is recommended to give the students forewarning that many applications will close and to save work prior to starting the quiz.
  • Download site: The default SEB download site, after the download begins, redirects one to a confusing SourceForge page with links to what may be malware. The license for SEB looks to allow an institution to host its own download files.
  • SEB templates: There is an option for templates to be used when configuring SEB. This is complicated by the fact that you cannot use the SEB utility to set up the templates. You must configure a quiz manually from within Moodle, and then download the configuration file from the quiz. Then the config file can be uploaded by a Moodle admin via Administration > Plugins > Activity modules > Quiz > Safe Exam Browser templates.

What didn’t work

  • Manually customizing the .seb file: Because the Moodle interface provides limited configurations, we attempted, unsuccessfully, to customize the .seb file, which serves as the configuration file for Safe Exam Browser. We wanted to see if it was possible to customize the .seb file to allow for the launching of applications like Word, which is not a configuration setting in Moodle Quiz. In our experience, the only way to successfully change the .seb file was to update the Moodle Quiz SEB settings.
  • Safe Exam Browser on iOS: The SEB iOS app didn’t provide any lockdown functions.
  • Safe Exam Browser on Android OS: There is currently no official Android compatible version of SEB.

Recommendations for using Safe Exam Browser

  • Set up a practice, no or low-stakes quiz in one’s course to ensure the students are able to access and take the quiz. This may also help reduce any anxiety surrounding the use of SEB.
  • Remind students that when SEB is launched, it will close many applications on their computer, so they should save any work in progress to ensure nothing is lost.
  • Use for in-person, proctored exams to provide in-person support should questions arise.
  • Only use built-in Moodle Quiz Safe Exam Browser functions–don’t try to customize the .seb file manually.
  • If including links in questions, set them to “Open in new window” because Safe Exam Browser doesn’t include navigation buttons to go back. Use “Expressions allowed” to limit access to specific websites:
    • Don’t include https:// when adding URLs to the list
    • Each URL should be listed on its own line
    • Add /* after one’s Moodle domain to ensure access to all Moodle access is available (e.g., moodle.lafayette.edu/*)
    • Add /* after domain to allow for access to all pages on a site
  • Have a backup plan such as having extra computers on hand for those students who may not have a compliant device, or use Blue Books.

AI Subsystem in Moodle 4.5

One of the many new features in Moodle 4.5 is the AI Subsystem. Given the buzz around AI development and the wild pace of change with LLM based tools it isn’t a surprise to see the beginnings of AI incorporated into Moodle. At the Lafeyette College-hosted Winter Hack/Doc 2025 I spent some time exploring the functionality. The development task for AI was documented by Moodle as “AI subsystem MVP”. The functionality released in Moodle 4.5 consists of three primary user facing interfaces into AI tools, “Generate Text”, “Generate Image,” and “Summarize”.

AI Implementation

For the new features to be available an admin needs to visit the AI section of the Site Administration menu. In Moodle 4.5, two AI providers are supported, OpenAI and AzureAI. Without a valid configuration, UI elements regarding AI are not shown.

AI Provider Configuration

The configuration for the AI providers is broken down into two areas. The first involves configuring the API keys and other requirements for your connection.

Image of the configuration options for Azure AI inside Moodle 4.5 the options. The Options are: Azure AI API Key, Azure AI API Endpoint, a checkbox to enable/disable a site-wide rate limit (default: off), the field for the maximum site wide requests per hour (default if enabled: 100), a checkbox to enable/disable user limits (default: off), and the field for the user requests per hour limit (default if enabled: 10).
Azure AI Configuration options

You can enable a maximum number of requests per person and/or at the server level for communications with the AI provider.

Below the AI provider configuration there are three configurations for each of the user facing interfaces. In addition to individual toggles these include configuration of API versions (these vary slightly between providers, OpenAI screenshot provided below), but also contain an area for a set of System Instructions. These are instructions passed along to the AI Model prior to the content of the user’s prompt:

Screenshot of the configuration of the Generate Text for ChatGPT under Moodle 4.5 showing the 3 configuration options. Those options are: AI model, the AI endpoint and System Instructions. The default for system instructions are: "You will receive a text input from the user. Your task is to generate text based on their request. Follow these important instructions: 1. Return the summary in plain text only. 2. Do not include any markdown formatting, greetings, or platitudes."
Generate Text Settings

AI Placement Configuration

Located below the provider configuration are AI Placement configurations. These allow for UI based control over enabling/disabling of AI elements in the text editor (generate text/image) and course pages (summarize).

User Experience with AI Tools enabled in Moodle

The “universal” sparkle/diamonds symbol indicating AI are added to the toolbar when Text Editor placement is enabled (and an API provider is configured). In further confirmation that Atto editor is being deprecated the Atto editor doesn’t have the AI buttons. Under the sparkles the user experiences two options if everything is enabled: Generate Text, Generate Image. If one or the other is disabled, the sparkles are replaced by a pictogram indicating the one remaining enabled option instead of pure sparkles.

The first time a user first clicks any of the AI tool options, an AI Usage Policy appears. If the user declines, the AI dialog closes. If they accept they are allowed to proceed into the tool.

Screen shot of the AI policy default settings in Moodle 4.5: <h4><strong>Welcome to the new AI feature!</strong></h4> <p>This Artificial Intelligence (AI) feature is based solely on external Large Language Models (LLM) to improve your learning and teaching experience. Before you start using these AI services, please read this usage policy.</p> <h4><strong>Accuracy of AI-generated content</strong></h4> <p>AI can give useful suggestions and information, but its accuracy may vary. You should always double-check the information provided to make sure it's accurate, complete, and suitable for your specific situation.</p> <h4><strong>How your data is processed</strong></h4> <p>This AI feature uses external Large Language Models (LLM). If you use this feature, any information or personal data you share will be handled according to the privacy policy of those LLMs. We recommend that you read their privacy policy to understand how they will handle your data. Additionally, a record of your interactions with the AI features may be saved in this site.</p> <p>If you have questions about how your data is processed, please check with your teachers or learning organisation.</p> <p>By continuing, you acknowledge that you understand and agree to this policy.</p>

The policy text lives in the language pack under core > ai.php. It’s named “userpolicy”.

The summarize button appears in lots of places by default but the portion of the page that it sends to the AI provider for summary doesn’t always make sense. For example, on this quiz page with a description of the assignment (well, sort of) the student doesn’t get any useful information from the quiz description that the instructor “provided”.

A bad AI summary of a Quiz

Limiting AI availability inside Moodle to specific courses

In the event that your institution has the appropriate subscriptions and you think someone might need to access the functionality in Moodle but you don’t want to make it available to your whole community we suggest the following implementation.

Set the following permissions to PREVENT at the site level for the teacher, student, and other roles at your institution that shouldn’t see the tools:

  • aiplacement/courseassist:summarise_text: controls access to the Summarize text button
  • aiplacement/editor:generate_text: Controls access to the generate text button in the TinyMCE interface
  • aiplacement/editor:generate_image: Controls access to the generate image button in the TinyMCE interface

Once they are set to prevent you can override these capabilities to ALLOW at the course (instructor capability under Participants -> Permissions) or category level where appropriate.

Note: CLAMP didn’t have access to both providers so I can’t provide insight into what happens if both providers are enabled. Do users get two “generate image buttons/summarize/etc” or a choice after clicking the button? If you experiment with this let us know!

Image redaction and orientation in Moodle 4.5

Moodle 4.5 introduces many new features which we’ll be covering in the forthcoming report out of the 2025 Winter Hack/Doc Fest. Here, I’m going to highlight one in particular: image redaction. This is a new security feature that will automatically strip out geolocation data from uploaded images. It’s important that you configure it correctly, because at the moment there’s a bug that could cause many images that have a portrait orientation to display in landscape.

Exif and GPS data

Exif is a metadata standard implemented by images. You can specify a dizzying array of information, but we’re concerned here with just a few fields: geographic coordinates, image width and height, and orientation. When smartphones take images they include latitude and longitude unless you disable that behavior on your phone. For example, here’s a photo I took from the rear of the California Zephyr in 2018:

Railroad tracks disappear into the horizonMy notes say that I took it in Utah. The encoded GPS information says that I took in near Mt. Elliott, about twenty miles northwest of Green River. Here’s what that data looks like:

GPS Altitude  : 1419 m Above Sea Level
GPS Date/Time : 2018:10:21 00:14:56Z
GPS Latitude  : 39 deg 9' 39.62" N
GPS Longitude : 110 deg 20' 33.62" W
GPS Position  : 39 deg 9' 39.62" N, 110 deg 20' 33.62" W

This is pretty useful for knowing where I when I took this! This might be less useful if I’d taken this picture somewhere private–say from a dorm room when I’m uploading an assignment to Moodle. Location data can be a major privacy risk if disclosed inadvertently.

Exif and Orientation

Another use of Exif data is to store the width and height of the image and its orientation (portrait or landscape). Some smartphones, particularly the iPhones we tested at Hack/Doc, store all images in the landscape format but then set the orientation to indicate that they should be displayed in portrait mode:

Orientation  : Rotate 90 CW
Image Width  : 5712
Image Height : 4284
Image Size   : 5712x4284

An image with the width greater than the height would imply landscape except that Orientation is set to “Rotate 90 CW”: rotate ninety degrees clockwise. When you view that image, you’ll see it in portrait mode so long as the browser or image software respects that Exif data.

Redaction

Moodle 4.5 adds a new feature called EXIF remover to strip out GPS information. It’s located in Site administration > Server > File redaction > EXIF remover. If you’re installing a new 4.5 instance it’s enabled by default; if you’re upgrading an existing instance to Moodle 4.5 it’s off by default and you have to choose to turn it on. By default, it uses the GD library to reprocess the image. GD doesn’t have special features for managing Exif metadata; GD will remove all fields, including Orientation! That’s undesirable at best, and probably a bug (see MDL-84128).

Moodle HQ doesn’t recommend running this way and CLAMP doesn’t either. The recommended approach is to install exiftool on your server and configure your Moodle instance to use it. Exiftool is a common command-line application; it’s available for Windows and Mac and most Linux distributions. I used it to extract the Exif examples in this post. Once you’ve installed it (or your hosting provider has), you need to configure the path in Site administration. Below is an example of a working configuration:

Moodle configuration page. Enable EXIF remover is checked. Path to ExifTool is set to "/usr/bin/exiftool". The EXIF tags that will be removed is set to GPS only.

Exiftool will output a new image with the given Exif tags removed but won’t change anything else. I assume that the GD option was provided as a fallback since it doesn’t require new external tools or new PHP libraries, but I don’t think it should be enabled by default because of the real possibility that it breaks image uploads from smartphones.

TeXshop icon

Making LaTeX accessible

The first question most people ask is, “Isn’t there an export option to make PDFs created in LaTeX accessible?” It may be theoretically possible, but no one has developed or maintained a package that does it successfully. The main issue is that LaTeX-to-PDF exports have equations and graphs, etc, exported as images without alt-text. In other words, these PDFs are inaccessible.

So the alternatives are to:

Our research here at Swarthmore has led us to find outdated packages for LaTeX that do not successfully export to an accessible PDF. Many were developed by folks at universities in search of a solution.

What we recommend, instead, is to prepare LaTeX for export to HTML.

Resources needed

Prepare LaTeX for export to HTML

In order to achieve 99% accessibility with any output, the easiest answer is to edit the source document. In this case, we will need to edit our LaTeX code so that the .html meets accessibility best practices.

  • Insert title in preamble metadata: \title{_} ;
  • Insert sections in document body: \section{_}, etc ;
  • Use \enumerate{_} \item \item … \end{enumerate} for numbered lists;
  • Use \itemize{_} \item \item … \end{itemize} for bulleted or unordered lists;
  • Use only one font attribute for emphasis.
  • Use all caps and italics sparingly.
  • Use color contrast according to WCAG compliance. WebAIM: Contrast Checker.
  • Use tables only for tabular information.
  • Use alt text for images, diagrams, etc. Images Tutorial | Web Accessibility Initiative (WAI) | W3C.

Export the LaTeX to HTML

  1. Download and install PANDOC to your computer / local environment if you haven’t already.
  2. Review LaTeX to HTML via PANDOC | Dan W. Joyce to understand what the codes mean.
  3. Open your Command Line Interface (CLI).
  4. Copy and paste the following command at the prompt: pandoc --shift-heading-level-by=1 --mathjax -f latex -t html -s -o <file>.html <file>.tex.

What does this have to do with Moodle?

When we discuss best practices in accessibility, we talk about

  • allowing an end user to choose their preference.
  • maintaining accessibility in the source document.

In the case of LaTeX, we have had students prefer to read the .tex file exactly as .tex because that is easier for them than the inaccessible PDF. Might we find ways to have Moodle export a .tex file to .html or .pdf or something else in some quick and easy way?

For now, we instruct faculty on how to post .html files on their Moodle sites.

Posting HTML files to Moodle

These are the current steps to post a remediated HTML to Moodle, as given to instructors at Swarthmore, where we post remediated files to Google Drive:

When downloading a folder from Google drive, it becomes a .zip file. You may choose to download each folder for your remediations and then directly upload them to your Moodle course page. Here’s how to do that.

  1. Open the Moodle course in which you’d like to place the .html.
  2. Enable Edit mode.
  3. Add an activity or resource.
  4. Choose File.
  5. Fill out the required field: Name.
  6. Choose the .zip file that contains the whole folder with everything in it.
  7. Once it’s showing in the “Select files” area, select the folder.
  8. In the dialog box that pops up, choose Unzip.
  9. You will likely see:
    • an images folder, if there are images
    • the .html or .xhtml file.
    • the original .zip file.
  10. Delete the .zip file.
  11. Select the .html or .xhtml file.
  12. Choose Set main file.
  13. Choose Save and return to course.

Some professors choose to put the .html, .tex, and keep the .pdf so students can choose from the .html, .tex, and the .pdf files. Others replace .pdfs with the .html altogether. HTML files, when done correctly, are generally more accessible than .pdfs.

For more information on posting displaying a website index page or .html to your Moodle site, refer to Moodle’s File Resource Settings page.

How you can help

  • Can you think of ways to streamline this process?
  • Can you think of ways to have Moodle export any file, including .tex or .docx or .pptx to .html or .pdf or something else in some quick and easy way? It could be by the end user (student, presumably) or the faculty.
  • Are you aware of other ways to handle STEM in an accessible manner?
  • Learn and implement accessibility practices every day!

We discussed a few of these at Hack/Doc in June and feel the project is just beginning.

Reach out to accessibility@swarthmore.edu if you have thoughts about this or other accessible STEM topics.

Additional, potentially helpful resources

Acknowledgements

The folks below contributed in various ways to our thought process about accessible STEM, particularly LaTeX.